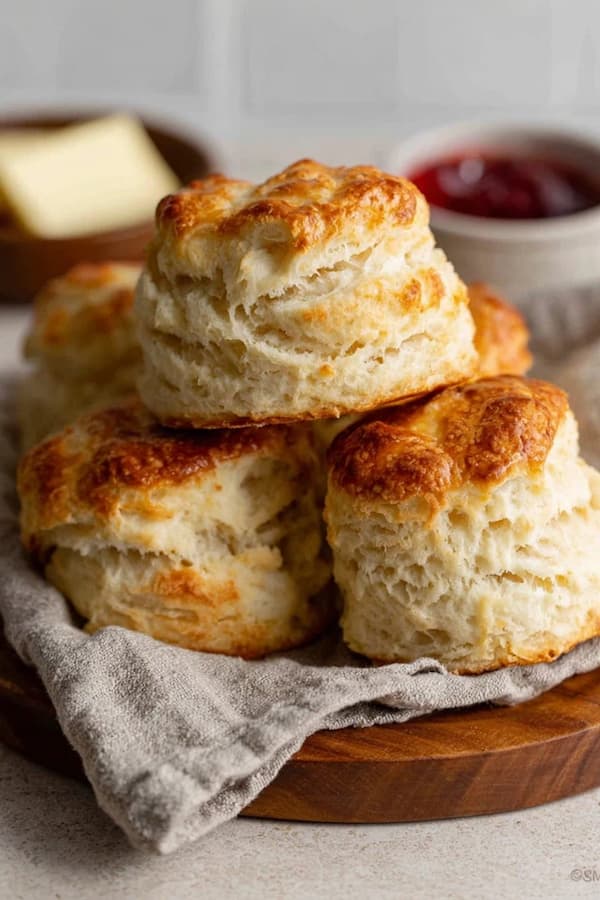
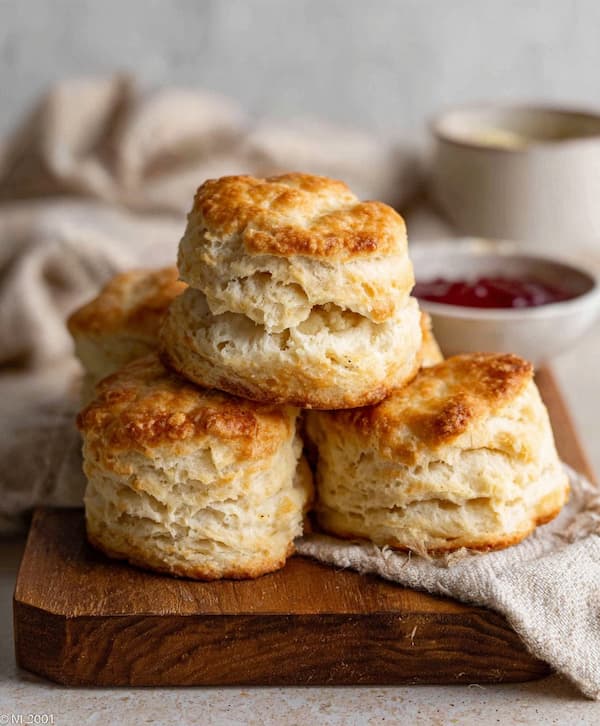
There is a specific kind of joy that comes from pulling a tray of tall, flaky biscuits out of a hot oven.
These are not the flat, hard pucks you find in a frozen box; they are light, buttery, and pull apart in perfect layers. You only need a few basic pantry items and a light touch to master this classic comfort food.
Ingredients
This recipe makes 8 large biscuits, perfect for a family breakfast or as a side for a big pot of stew.
- 2 cups all-purpose flour (plus a little extra for your hands and the counter)
- 1 tablespoon baking powder
- 1/4 teaspoon baking soda
- 1 teaspoon fine sea salt
- 1 tablespoon white sugar
- 6 tablespoons unsalted butter, very cold and cut into small cubes
- 3/4 cup cold buttermilk (shake the carton before pouring)
- 1 tablespoon melted butter (for brushing on top)
The Secret
The biggest hurdle for most people when making biscuits is the fear of the dough. We are often taught to knead dough until it is smooth, like when making bread or pizza. With biscuits, that is the exact opposite of what you want to do.
The goal here is to keep the butter as cold as possible until the moment the tray enters the oven.
When cold butter hits a hot oven, the water inside the butter turns into steam. This steam is what pushes the layers of dough apart, creating those flaky sections we all love. If you handle the dough too much, the heat from your hands will melt the butter before it even sees the oven.
This results in a flat, greasy biscuit. Treat the dough like it is fragile, and it will reward you with height and crunch.
Dry Mix
Whisk your flour, baking powder, baking soda, salt, and sugar in a large bowl. You want to make sure the leavening agents (the powder and soda) are evenly distributed. If they clump in one spot, some biscuits will rise like mountains while others stay flat.
A quick whisking also aerates the flour, which helps keep the final product light.
Butter Cut
Add your cold butter cubes to the flour. Use a pastry cutter or two forks to press the butter into the flour.
You are looking for the mixture to look like coarse crumbs. Some pieces should be the size of peas, while others might look like grains of sand. If the butter starts to feel soft or sticky, put the whole bowl in the freezer for five minutes to firm it up again.
Milk Well
Make a small hole, or a “well,” in the center of your flour mixture. Pour in the cold buttermilk all at once. Use a sturdy spoon or a spatula to gently fold the flour into the milk. Stop as soon as the flour is mostly wet and a shaggy dough starts to form. It should not look smooth.
If there are still a few dry streaks of flour at the bottom of the bowl, that is perfectly fine.
Fold Layers
Turn the dough out onto a floured surface. Gently pat it into a rough square. To get those “top-notch” flakes, you are going to fold the dough like a piece of paper. Fold it in half, pat it down, and rotate it. Repeat this four or five times.

This process creates thin layers of butter and flour. Do not use a rolling pin yet; the warmth of the wood or plastic can melt your butter. Use your hands and move quickly.
Final Cut
Pat the dough down until it is about one inch thick. Use a round biscuit cutter to press straight down. Do not twist the cutter. If you twist it, you “seal” the edges of the dough, and the biscuit will not be able to rise upward. It will just puff in the middle and stay short.
If you do not have a cutter, a sharp knife works well—just cut the dough into squares so you don’t have to keep re-rolling the scraps.
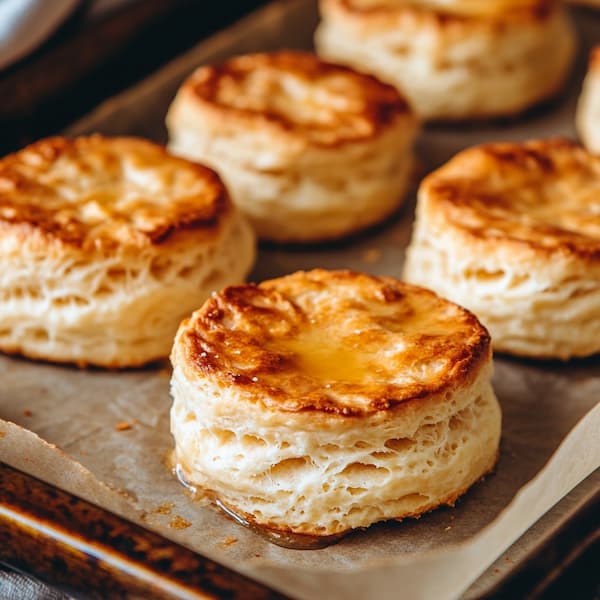
Heat Blast
Place the biscuits on a baking sheet so they are just barely touching each other. This helps them stay upright and climb higher as they bake. Slide them into a preheated 425°F oven. Bake for about 12 to 15 minutes.
You are looking for a deep golden brown on the tops and a nice toasted color on the bottoms. As soon as they come out, brush the tops with the melted butter for that classic shine.
Better Texture
If you want to ensure your biscuits are the best they can be, make sure your buttermilk is fresh. Buttermilk is acidic, and that acid reacts with the baking soda to create air bubbles. If your buttermilk has been sitting in the fridge for a month, it might lose some of its punch.
Also, think about your flour. While all-purpose flour is the standard, some people prefer “Southern-style” flour which has a lower protein content.
This makes the biscuit even more tender. However, the folding technique mentioned in step four will give you great results with any standard flour you have in your cabinet.
Common Pitfalls
One big mistake is over-mixing the dough once the milk is added. The more you stir, the more gluten you develop. Gluten is great for chewy bread, but it makes biscuits tough and rubbery. Stir just until the dough holds together, then stop.
Another issue is a cold oven. If your oven is not truly at 425°F when the biscuits go in, the butter will melt slowly and leak out onto the pan instead of creating steam.
Use an oven thermometer if you have one to make sure your stove is lying to you. A hot oven is the key to that initial “spring” that gives the biscuit its height.
Why Is My Buttermilk Biscuit Not Rising Correctly?
If your biscuits come out short and dense, it usually points to one of two things: your baking powder is old or you twisted the cutter. Baking powder loses its power over time. To check if yours is still good, drop a pinch into a cup of hot water.
If it bubbles vigorously, it is fine. If it just sits there, throw it away and buy a new tin. Also, remember that pressing straight down with your cutter is vital. If the edges are pinched or twisted, the layers are stuck together and cannot expand.
Can I Use A Substitute If I Do Not Have Buttermilk?
Yes, you can make a quick version of buttermilk at home. For this recipe, take 3/4 cup of regular whole milk and add one tablespoon of lemon juice or white vinegar. Let it sit on the counter for five minutes until it looks slightly curdled.
While this “sour milk” doesn’t have the exact same thickness as real buttermilk, the acid will still react with the baking soda to give you a good rise. Avoid using skim milk for this, as the fat in whole milk is necessary for the flavor and the tender crumb of the biscuit.
A Must Try Biscuits!
There is a reason biscuits have been a staple of home cooking for hundreds of years. They are simple, they are cheap to make, and they bring a sense of warmth to the table that few other foods can match. You do not need fancy tools or a culinary degree to get this right.
Once you master the basic folding technique, you can start adding your own twists. Toss in some shredded cheddar cheese and chives, or a bit of cracked black pepper.
These biscuits are a blank canvas for whatever you feel like eating. Just remember to keep your butter cold and your hands off the dough as much as possible.
Ingredients
Method
- Whisk your flour, baking powder, baking soda, salt, and sugar in a large bowl. You want to make sure the leavening agents (the powder and soda) are evenly distributed.
- Add your cold butter cubes to the flour. Use a pastry cutter or two forks to press the butter into the flour. You are looking for the mixture to look like coarse crumbs. Some pieces should be the size of peas, while others might look like grains of sand.
- Make a small hole, or a “well,” in the center of your flour mixture. Pour in the cold buttermilk all at once. Use a sturdy spoon or a spatula to gently fold the flour into the milk. Stop as soon as the flour is mostly wet and a shaggy dough starts to form. It should not look smooth.
- Turn the dough out onto a floured surface. Gently pat it into a rough square. To get those “top-notch” flakes, you are going to fold the dough like a piece of paper. Fold it in half, pat it down, and rotate it. Repeat this four or five times.
- Pat the dough down until it is about one inch thick. Use a round biscuit cutter to press straight down. Do not twist the cutter. If you twist it, you “seal” the edges of the dough, and the biscuit will not be able to rise upward. It will just puff in the middle and stay short.
- Place the biscuits on a baking sheet so they are just barely touching each other. Slide them into a preheated 425°F oven. Bake for about 12 to 15 minutes. As soon as they come out, brush the tops with the melted butter for that classic shine.

Loved the buttery taste and crisp edges!