Are you looking for a healthier alternative to traditional chips? Crispy zucchini chips are the perfect snack for when you’re craving something crunchy but want to avoid all the extra calories and unhealthy fats.
They’re low in calories, high in nutrients, and satisfy your desire for something crispy and delicious. Let’s dive into how you can make these tasty treats in your own kitchen.
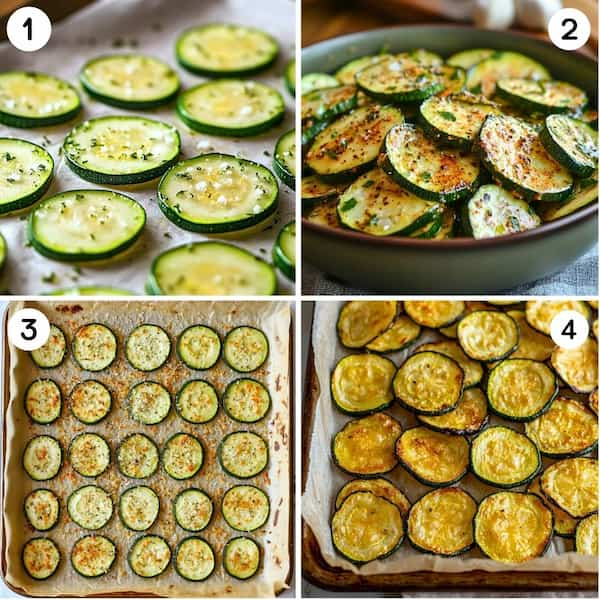
Pin it for later!

Why Choose Zucchini Chips?
Zucchini, often underrated, is a vegetable packed with numerous health benefits. It’s rich in vitamins A, C, and K, as well as potassium, magnesium, and dietary fiber. What makes zucchini even more attractive for those seeking a healthier lifestyle is its low-calorie content.
When baked, it transforms into a light, crispy snack without the added fats or oils you’d find in traditional fried chips.
These zucchini chips are not only delicious, but they are also gluten-free, keto-friendly, and can easily fit into various diets. Plus, they’re easy to make at home and allow you to customize the seasoning to suit your taste.
Ingredients
Before starting, gather these simple ingredients:
- 2 medium zucchinis
- 1–2 tablespoons of olive oil (or avocado oil for a healthier option)
- ½ teaspoon of sea salt
- ½ teaspoon of garlic powder
- ½ teaspoon of smoked paprika (optional for a little extra flavor)
- ¼ teaspoon of black pepper
- Grated parmesan (optional for added flavor and crunch)

Step-by-Step Instructions for Crispy Zucchini Chips
Step 1: Preheat Your Oven
To start, preheat your oven to 250°F (120°C). This low temperature helps the zucchini slices to slowly dehydrate and crisp up without burning. You want them to bake evenly for a perfect crunch.
Step 2: Prepare the Zucchini
Wash and dry your zucchinis thoroughly. Once dried, slice them into thin rounds using a sharp knife or a mandolin. The thinner the slices, the crispier your chips will turn out. Aim for about 1/8-inch thickness.
To get ultra-thin, even slices, I recommend using a mandoline slicer like this one. It makes the slicing quick, easy, and perfectly uniform.
Step 3: Remove Excess Moisture
Zucchini contains a high water content, so it’s crucial to remove as much moisture as possible to achieve crispy chips.
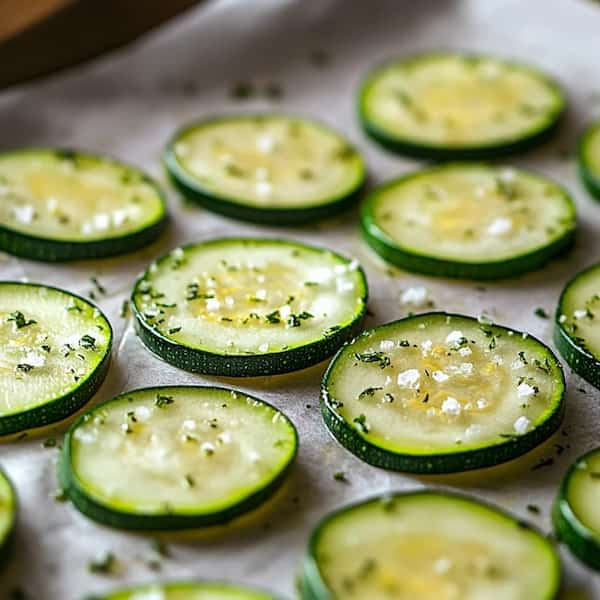
Lay the zucchini slices on a paper towel and sprinkle them lightly with salt. Allow them to sit for about 10 minutes.
The salt will draw out some of the water. Afterward, gently pat the slices with another paper towel to soak up the moisture.
Step 4: Season the Zucchini Slices
In a large bowl, toss the zucchini slices with olive oil, ensuring they’re evenly coated. Add your salt, garlic powder, smoked paprika, and black pepper.
If you want an extra cheesy crunch, sprinkle in some grated parmesan at this point. Toss the slices again to coat them with the seasoning mixture.
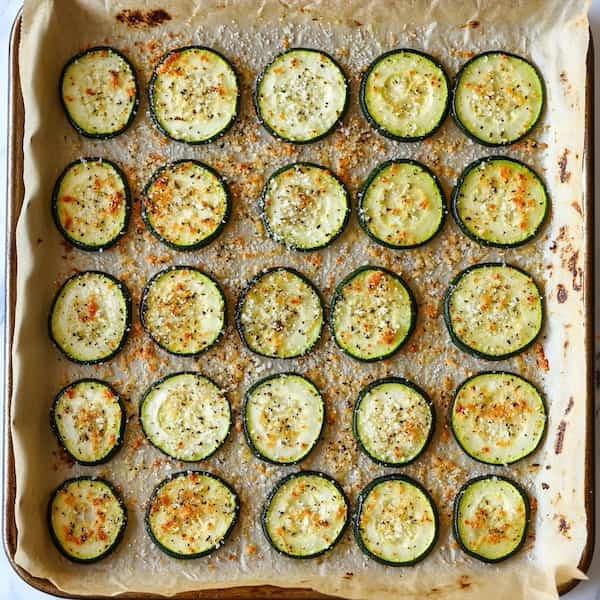
Step 5: Arrange and Bake
Line a baking sheet with parchment paper to prevent sticking. Arrange the zucchini slices in a single layer, making sure none overlap.
Overlapping will prevent them from crisping properly. If necessary, use two baking sheets.
Place the sheets in the oven and bake for about 1.5 to 2 hours, flipping the slices halfway through to ensure even crisping. The low temperature ensures that the zucchini dehydrates and becomes crispy without burning.
Step 6: Check for Crispiness
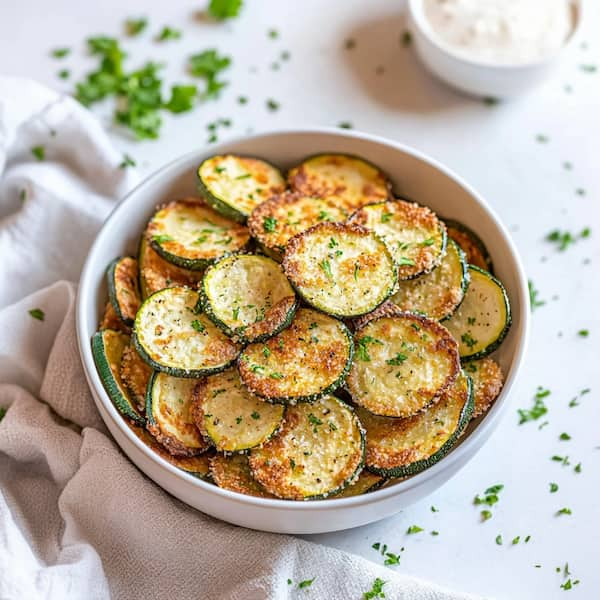
Around the 90-minute mark, check your chips. They should be golden brown and crispy to the touch. If they’re still soft, allow them to bake for a bit longer.

Once they’re ready, remove them from the oven and let them cool for 5 minutes. This cooling process helps them firm up even more.
Tips for Perfect Zucchini Chips
Getting zucchini chips just right is all about the details. First off, consistency is key — make sure you slice the zucchini as evenly as possible. A mandoline slicer works great for this. If your slices vary in thickness, some will turn out too crispy while others stay soft or soggy.
Next, don’t overcrowd the pan. Lay the slices out in a single layer with space in between to let air circulate properly. If they overlap, they’ll steam instead of bake, and that defeats the whole purpose of crispy chips.
Patience really pays off here. Low and slow is the name of the game. Baking at a lower temperature may take longer, but it allows the chips to fully dehydrate and crisp up without burning. Cranking up the heat might speed things up, but you’ll likely end up with unevenly cooked or scorched chips.
And finally, have fun with the flavor. Zucchini is a blank canvas. Add a pinch of chili powder for some heat, toss on garlic powder for a savory vibe, or try nutritional yeast for a cheesy, vegan-friendly kick. The possibilities are endless.
Serving Suggestions
Crispy zucchini chips pair well with various dips like hummus, guacamole, or Greek yogurt-based dips. They’re also a great side for sandwiches, burgers, or a light appetizer for parties.
For a healthy and delicious snack combo, you can serve them alongside other baked vegetable chips like sweet potato or kale.
Storage
Store any leftover zucchini chips in an airtight container at room temperature for up to 3 days. To maintain their crispiness, avoid storing them in the fridge.
If they lose their crunch, pop them back into the oven for a few minutes before serving.
Final Thoughts
Crispy zucchini chips are an easy, healthy alternative to store-bought snacks. With minimal ingredients and a simple baking process, you can enjoy a guilt-free treat anytime.
Plus, they’re versatile enough to enjoy with various dips and seasonings, making them a snack everyone will love. The next time you’re craving something crunchy, reach for this homemade option instead of the usual processed chips. You won’t be disappointed!

Ingredients
Method
- To start, preheat your oven to 250°F (120°C). Wash and dry your zucchinis thoroughly. Once dried, slice them into thin rounds using a sharp knife or a mandolin. Aim for about 1/8-inch thickness.
- Lay the zucchini slices on a paper towel and sprinkle them lightly with salt. Allow them to sit for about 10 minutes. The salt will draw out some of the water. Afterward, gently pat the slices with another paper towel to soak up the moisture.
- In a large bowl, toss the zucchini slices with olive oil, ensuring they’re evenly coated. Add your salt, garlic powder, smoked paprika, and black pepper.
- If you want an extra cheesy crunch, sprinkle in some grated parmesan at this point. Toss the slices again to coat them with the seasoning mixture.
- Line a baking sheet with parchment paper to prevent sticking. Place the sheets in the oven and bake for about 1.5 to 2 hours, flipping the slices halfway through to ensure even crisping.
- Around the 90-minute mark, check your chips. They should be golden brown and crispy to the touch. If they’re still soft, allow them to bake for a bit longer.
Notes