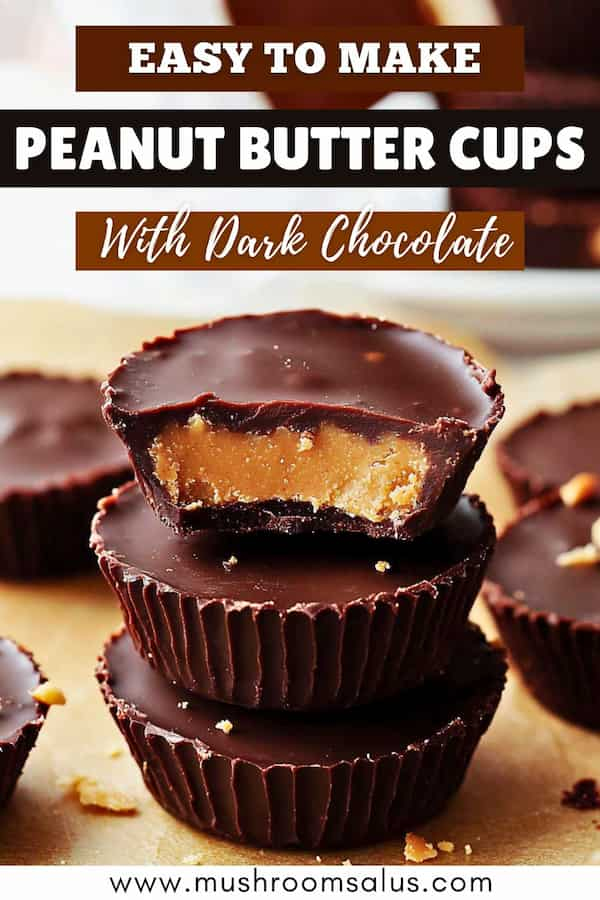
Let’s make Homemade Peanut Butter Cups!
With just a handful of simple, wholesome ingredients, you can whip up a batch of these decadent treats in no time. Plus, this recipe is naturally gluten-free, dairy-free, refined sugar-free, and paleo-friendly!
Let’s dive into this easy, foolproof recipe that will satisfy your sweet tooth while keeping things clean and nutritious.
Pin it for later!
Why You’ll Love This Recipe
- 100% Vegan & Dairy-Free — No butter, no milk, just pure plant-based goodness!
- Refined Sugar-Free — Sweetened naturally with maple syrup or coconut sugar.
- Simple Ingredients — Only 5 main ingredients needed!
- Customizable — Add nuts, seeds, or superfoods to make them your own.
- No Baking Required — Just melt, mix, and chill!
Ingredients You’ll Need
These homemade peanut butter cups come together with just a few pantry staples:
For the Chocolate Layers:
- 1 cup dairy-free dark chocolate chips (70% or higher cacao)
- 2 tablespoons coconut oil (helps the chocolate melt smoothly)
For the Peanut Butter Filling:
- ½ cup natural creamy peanut butter (look for one with just peanuts and salt)
- 2 tablespoons maple syrup or coconut sugar (for a touch of sweetness)
- ¼ teaspoon vanilla extract (adds depth of flavor)
- Pinch of sea salt (balances out the sweetness)
Step-by-Step Instructions
Step 1: Melt the Chocolate
Start by melting the dairy-free dark chocolate chips with coconut oil. You can do this in a microwave in 20-second intervals, stirring in between, or use a double boiler on the stovetop. Once the chocolate is silky smooth, set it aside.
Step 2: Prep the Peanut Butter Filling
In a bowl, mix together peanut butter, maple syrup, vanilla extract, and sea salt. Stir well until smooth and creamy. If your peanut butter is too thick, you can warm it slightly for easier mixing.
Step 3: Assemble the Cups
Line a muffin tin with paper liners or use silicone molds for easy removal. Pour about 1 teaspoon of melted chocolate into the bottom of each liner. Tilt the tray slightly so the chocolate spreads evenly. Place in the freezer for 10 minutes to firm up.
Once the base is set, scoop about 1 teaspoon of peanut butter filling into each cup. Flatten slightly, but don’t spread it all the way to the edges — you want some space for the top chocolate layer.
Step 4: Seal with More Chocolate
Pour another teaspoon of melted chocolate over the peanut butter layer, making sure it fully covers the filling. Use a spoon to smooth out the tops if needed.
Step 5: Chill and Set
Place the peanut butter cups back in the freezer for about 20 minutes or until fully set. Once hardened, they’re ready to enjoy!
Storage Tips
- Fridge: Store in an airtight container in the fridge for up to 2 weeks.
- Freezer: Keep them frozen for up to 3 months — just let them sit at room temp for a few minutes before biting in!
Customization Ideas
Want to mix things up? Try these fun variations:
- Nut-Free Version: Swap peanut butter for sunflower seed butter.
- Extra Chocolatey: Stir cacao nibs into the filling for crunch.
- Coconut Twist: Add shredded coconut to the peanut butter layer.
- Spicy Kick: A pinch of cayenne pepper in the chocolate for heat.
- Mocha Style: Mix instant espresso powder into the chocolate.
Why Homemade is Better Than Store-Bought
- Most commercial peanut butter cups contain:
- Processed sugars and artificial flavors
- Hydrogenated oils and unhealthy fats
- Dairy ingredients that may not work for those avoiding milk
When you make them at home, you control the ingredients — no junk, just real food! Plus, you can adjust the sweetness and flavors exactly how you like.
Final Thoughts
These healthy vegan peanut butter cups are everything you love about the classic treat but with better-for-you ingredients. They’re perfect for snacking, gifting, or satisfying a chocolate craving the clean way.
Whip up a batch today — you won’t regret it!
💬 Tried this recipe? Let me know how it turned out in the comments! Do you have a favorite add-in or twist? I’d love to hear it!