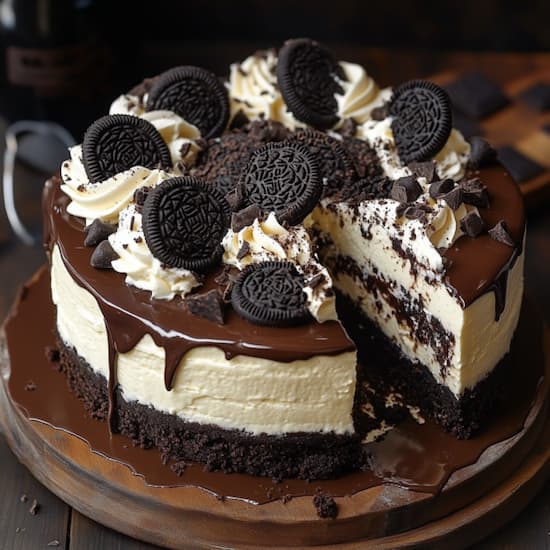
Craving something rich, decadent, and completely dairy-free? Look no further than this Vegan Oreo Cake.
With layers of moist chocolate cake, creamy frosting, and the classic crunch of Oreos, this dessert will satisfy even the most intense sweet tooth.
Perfect for birthdays, celebrations, or just a special treat, this Vegan Oreo Cake is sure to impress both vegans and non-vegans alike.
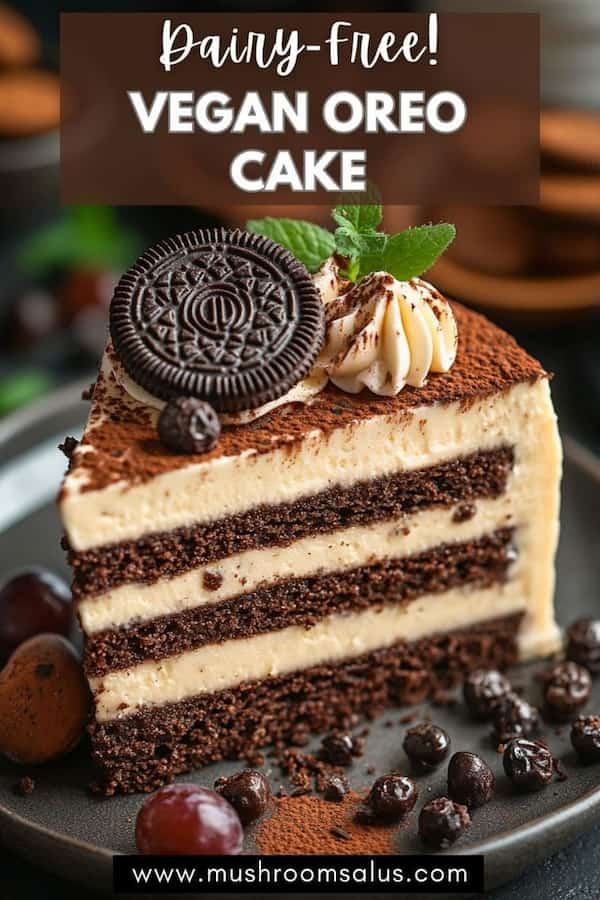
Pin it for later!
Ingredients
For the Cake:
- 2 cups all-purpose flour
- 1 ½ cups granulated sugar
- ¾ cup cocoa powder (unsweetened)
- 1 ½ teaspoons baking soda
- 1 ½ teaspoons baking powder
- ½ teaspoon salt
- 1 ½ cups almond milk (or any plant-based milk)
- ½ cup vegetable oil (or melted coconut oil)
- 2 tablespoons apple cider vinegar
- 1 teaspoon vanilla extract
- 1 cup boiling water
Oreo Frosting:
- ½ cup vegan butter (room temperature)
- ½ cup vegetable shortening (or additional vegan butter)
- 4 cups powdered sugar
- 1 teaspoon vanilla extract
- 3–4 tablespoons almond milk (or any plant-based milk)
- 12–15 Oreo cookies (crushed)
For Decoration:
- 8–10 Oreo cookies (whole or halved)
- Crushed Oreos (optional, for sprinkling)
Step-by-Step Instructions
1. Preheat Your Oven
Begin by preheating your oven to 350°F (175°C). This ensures your oven is at the correct temperature when the cake batter is ready.
Meanwhile, grease two 9-inch round cake pans with a bit of oil or line them with parchment paper. This step prevents the cake from sticking and makes it easier to remove once baked.
2. Mix the Dry Ingredients
In a large mixing bowl, combine the all-purpose flour, granulated sugar, cocoa powder, baking soda, baking powder, and salt.
Whisk these ingredients together until well incorporated. Mixing the dry ingredients first helps distribute the leavening agents (baking soda and baking powder) evenly, which is crucial for the cake to rise properly.
3. Combine the Wet Ingredients
In a separate bowl, whisk together the almond milk, vegetable oil, apple cider vinegar, and vanilla extract.
These ingredients add moisture and flavor to the cake, while the apple cider vinegar reacts with the baking soda to create a tender crumb. Make sure to mix thoroughly so the oil emulsifies well with the other liquids.
4. Create the Cake Batter
Gradually pour the wet ingredients into the bowl with the dry ingredients. Using a whisk or an electric mixer on low speed, combine the mixture until smooth and free of lumps. Once everything is well incorporated, slowly pour in the boiling water while mixing.
This may seem unusual, but the hot water helps bloom the cocoa, deepening the chocolate flavor and making the batter more pourable. Don’t worry if the batter seems thin; this will result in a moist and tender cake.
5. Bake the Cakes
Divide the batter evenly between the two prepared cake pans. Use a spatula to smooth the tops, ensuring an even bake. Place the pans in the preheated oven and bake for 30–35 minutes, or until a toothpick inserted into the center of the cakes comes out clean. Ovens vary, so start checking at the 30-minute mark.
Once baked, remove the cakes from the oven and allow them to cool in the pans for about 10 minutes before transferring them to a wire rack to cool completely.
6. Prepare the Oreo Frosting
While the cakes are cooling, prepare the Oreo frosting. In a large mixing bowl, beat the vegan butter and vegetable shortening together using an electric mixer until light and fluffy.
This usually takes about 2–3 minutes. Gradually add the powdered sugar, one cup at a time, mixing on low speed until fully incorporated.
Add the vanilla extract and 2 tablespoons of almond milk, and continue to beat the mixture until smooth and creamy. If the frosting is too thick, add more almond milk, one tablespoon at a time, until you reach the desired consistency.
Finally, fold in the crushed Oreos using a spatula, ensuring they are evenly distributed throughout the frosting.
7. Assemble the Cake
Once the cakes have completely cooled, it’s time to assemble your Oreo masterpiece. Place one cake layer on a serving plate or cake stand. Spread a generous amount of Oreo frosting on top, using an offset spatula to smooth it out.
Add the second cake layer on top, gently pressing it down to ensure it sticks. Frost the top and sides of the cake with the remaining Oreo frosting, making sure to cover the cake completely for a smooth finish.
8. Decorate the Cake
Now for the fun part — decorating! Arrange whole or halved Oreo cookies around the top edge of the cake or create a decorative pattern.
If you’re feeling extra indulgent, sprinkle additional crushed Oreos over the top and sides of the cake for added texture and visual appeal. You can also pipe extra frosting around the base or top edges using a piping bag fitted with a decorative tip.
9. Serve and Enjoy
After decorating, your Vegan Oreo Cake is ready to be enjoyed. Slice into the cake to reveal the rich chocolate layers and creamy Oreo frosting inside.
This cake pairs perfectly with a glass of cold almond milk or a scoop of vegan vanilla ice cream. Whether you’re sharing with friends and family or indulging on your own, this cake is sure to be a hit.
Tips for Success
- Measuring Flour: For best results, spoon the flour into your measuring cup and level it off with a knife. This prevents the cake from becoming too dense.
- Room Temperature Ingredients: Ensure that the almond milk and other liquid ingredients are at room temperature. This helps them blend more smoothly and evenly.
- Oreo Alternatives: Feel free to use any other vegan chocolate sandwich cookies if Oreos aren’t available or if you prefer a different flavor.
- Storing the Cake: Store any leftovers in an airtight container at room temperature for up to 3 days. For longer storage, refrigerate for up to a week or freeze for up to 2 months.
Conclusion
This Vegan Oreo Cake is a crowd-pleaser that combines the indulgence of chocolate and Oreos with the goodness of being completely plant-based. It’s easy to make, visually stunning, and absolutely delicious.
Whether you’re a seasoned baker or a novice, this recipe guides you every step of the way to create a cake that looks as amazing as it tastes.