Refried beans are a creamy and savory Mexican side dish that tastes much better when made from scratch than from a metal can.
This recipe uses slow-cooked aromatics and a simple mashing technique to create a velvety texture that pairs perfectly with any main course.
It is a top-notch way to turn a humble bag of beans into a rich, flavorful meal that feels like it came straight from a professional kitchen.
Ingredients
Yields: 6 servings
- 2 cans (15 oz each) pinto beans, or 3 cups cooked dry beans
- 1/2 cup bean liquid (reserved from the can or cooking pot)
- 2 tablespoons vegetable oil or lard
- 1/2 small white onion, finely diced
- 2 cloves garlic, minced
- 1/2 teaspoon ground cumin
- 1/4 teaspoon chili powder
- 1/2 teaspoon fine sea salt (adjust to taste)
- 1/4 cup crumbled cotija cheese or feta
- Toppings: Fresh cilantro, diced tomatoes, and sliced jalapeños.
Why You Must Try This Refried Beans Recipe
You should try this recipe because it completely redefines what a “side dish” can be by focusing on deep, layered flavors rather than just salt. The secret to a professional-grade refried bean is the “fry” part—cooking the onions and garlic until they are sweet and golden before adding the beans allows the fats to carry those scents into the creamy mash.
Unlike store-bought versions that often contain unnecessary preservatives or a metallic aftertaste, this homemade version is clean, bright, and fully customizable to your heat preference.
It is an incredibly affordable way to bulk up a dinner, providing a heavy, satisfying base for tacos, tostadas, or even just a warm bowl of rice. Plus, making them yourself allows you to control the texture, whether you like them completely smooth or with a few whole beans left for a more rustic, authentic feel.
Drain the Liquid
Start by opening your cans of pinto beans and pouring them into a colander over a bowl. It is very important that you do not pour the liquid down the drain; this “bean juice” contains starches that are vital for getting a smooth, professional consistency later on.
Set aside at least half a cup of this liquid. Rinse the beans under cold water for a few seconds to remove any excess salt from the canning process.
If you are using beans you cooked yourself from dry, simply scoop the beans out of the pot and keep some of the cooking broth nearby.
Sauté the Aromatics
Place a large skillet or a heavy pot over medium heat and add the vegetable oil or lard. Once the oil is hot and shimmering, add your finely diced white onion. Cook the onion for about five to seven minutes, stirring occasionally, until the edges are golden brown and the pieces look soft and translucent.
Add the minced garlic and cook for just one more minute. Garlic burns quickly, so you want to pull it off the heat or add the next ingredient as soon as it smells fragrant.
This step is the professional-level foundation that gives the beans their savory soul.
Bloom the Spices
Stir the ground cumin, chili powder, and salt into the oily onion mixture. Let the spices cook for about thirty seconds. This “blooming” process wakes up the dried herbs and allows their natural oils to mix with the fat in the pan.
You will notice the smell in your kitchen changes instantly from just onions to a warm, earthy Mexican aroma. Taking this extra half-minute is a top-notch move that ensures your refried beans don’t taste flat or under-seasoned.
Fry the Beans
Toss the drained pinto beans into the skillet with the onions and spices. Stir them around so they are completely coated in the oil. Let the beans fry undisturbed for about three minutes. You want the skins of some of the beans to pop and brown slightly against the hot metal.
This adds a subtle toasted flavor that you simply cannot get if you just boil the beans in liquid. Frying the beans before mashing them is the authentic way to get a professional result that stands out from basic recipes.
Mash the Texture
Lower the heat to medium-low and pour in half of your reserved bean liquid. Use a potato masher or the back of a large sturdy spoon to crush the beans directly in the pan. If you prefer a very smooth restaurant-style bean, you can mash them thoroughly until no whole beans remain.
If you like a more “home-style” texture, leave about a third of the beans whole. As you mash, the beans will soak up the liquid and start to look like a thick, creamy paste.
Adjust the Cream
If the beans look too dry or stiff, add the rest of your reserved liquid one tablespoon at a time. The beans will continue to thicken as they sit and cool, so it is a smart move to make them slightly thinner in the pan than you want them on the plate. Stir the mixture constantly as it simmers to prevent the bottom from scorching.
A top-notch refried bean should be “scoopable” but not runny. If you accidentally add too much liquid, just keep simmering for a few minutes until the excess water evaporates.
Melt the Finish
Turn off the heat and stir in half of your crumbled cotija cheese. The cheese won’t completely disappear, but it will soften and add a salty, creamy element to the mash. Taste a small spoonful and see if it needs more salt.
Depending on how salty your canned beans were, you might need an extra pinch to make the flavors truly pop. This is also the time to add a squeeze of fresh lime juice if you want to brighten the heavy, earthy tones of the pinto beans.
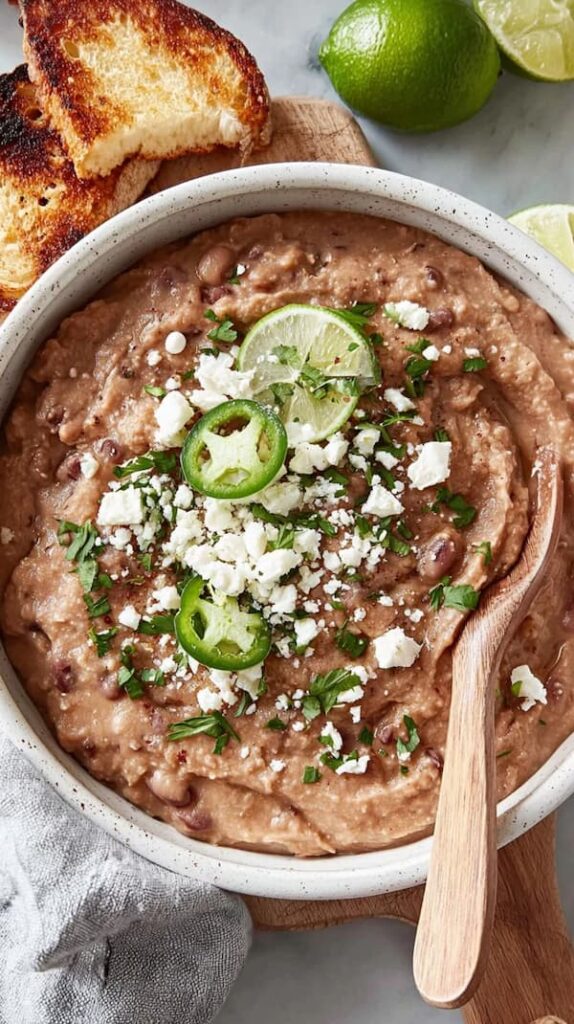
Garnish the Bowl
Scoop the warm beans into a serving bowl and smooth out the top with your spoon. Garnish with the remaining cotija cheese, a handful of fresh cilantro, and the diced tomatoes. The bright red and green colors on top of the brown beans make the dish look professional and inviting.
Serve these immediately while they are hot and steaming. They are the perfect base for a “top-notch” taco night or a simple dip for crunchy tortilla chips.
How To Make This Refried Beans Better
- Smoky Chipotle: Stir in a teaspoon of minced chipotle peppers in adobo sauce to give the beans a spicy, smoky kick that lingers.
- Brown Butter: Use browned butter instead of oil to sauté the onions for a nutty, rich flavor that feels very high-end.
- Pickled Juice: Add a tablespoon of the liquid from a jar of pickled jalapeños at the very end to provide a sharp, vinegary bite.
- Toasted Seeds: Sprinkle some toasted pumpkin seeds (pepitas) over the top right before serving to add a savory, nutty crunch.
What are the best beans to use for refrying?
Pinto beans are the traditional choice for refried beans because their skins are thin and their insides are incredibly creamy once cooked. They have a mild, earthy flavor thataks up spices very well. Black beans are another professional option if you want a slightly denser texture and a darker, more dramatic look on the plate.
While you can use kidney beans in a pinch, they tend to have thicker skins that don’t mash as smoothly, which can result in a grainier texture that isn’t quite as satisfying as the pinto version.
Can I make these beans ahead of time?
Yes, refried beans are a top-notch meal prep item because they store very well in the refrigerator for up to five days. When you are ready to eat them, you will notice they have become quite firm and solid.
To reheat, place them back in a skillet with a splash of water, broth, or milk and stir over low heat until they are creamy again.
You can also freeze refried beans in airtight bags for up to three months. Just thaw them overnight in the fridge before reheating for a quick and easy dinner side.

Ingredients
Method
- Open your cans of pinto beans over a bowl to catch the starchy liquid. Do not throw this out! This “liquid gold” is a top-notch professional secret for achieving a velvety texture. Set aside at least half a cup to use later for thinning the mash. Rinse the beans quickly to remove any excess canning salt so you have total control over the seasoning.
- Heat the oil or lard in a large skillet over medium heat. Add the finely diced white onion and cook until the edges turn a deep golden brown. Stir in the minced garlic for the final minute.
- Stir the cumin, chili powder, and sea salt into the hot oil and onions. Let them sizzle for about thirty seconds to “bloom” the spices. This heat exposure releases the natural oils within the dried herbs, intensifying their earthy scent.
- Add the drained pinto beans to the skillet. Toss them in the spiced oil and let them fry undisturbed for three minutes. You want to see some of the bean skins blister and brown against the hot pan.
- Pour in half of your reserved bean liquid and grab a potato masher or a sturdy spoon. Crush the beans directly in the skillet until you reach your desired consistency.
- If the mixture looks too stiff, stir in the rest of the reserved liquid until the beans are creamy and “scoopable.” Turn off the heat and fold in half of the crumbled cotija cheese. The residual heat will soften the cheese, adding a salty richness. Garnish with fresh cilantro and tomatoes before serving hot as a side dish or a hearty dip.
Notes
- Smoky Chipotle: Stir in a teaspoon of minced chipotle peppers in adobo sauce to give the beans a spicy, smoky kick that lingers.
- Brown Butter: Use browned butter instead of oil to sauté the onions for a nutty, rich flavor that feels very high-end.
- Pickled Juice: Add a tablespoon of the liquid from a jar of pickled jalapeños at the very end to provide a sharp, vinegary bite.
- Toasted Seeds: Sprinkle some toasted pumpkin seeds (pepitas) over the top right before serving to add a savory, nutty crunch.