Grilled corn on the cob is one of those things that barely needs a recipe, but getting it right — proper char, the right butter, good seasoning — makes a real difference.
This version uses a herb butter that goes on while the corn is still hot so it melts into every kernel. It’s the kind of side dish that ends up being the thing people talk about after the cookout.
Ingredients
Serves: 4–6
For the corn:
- 6 ears of fresh corn, husked
- 1 tablespoon olive oil or neutral oil
- Salt and black pepper to taste
For the herb butter:
- 4 tablespoons unsalted butter, softened
- 2 cloves garlic, finely grated or minced
- 1 tablespoon fresh parsley, finely chopped
- 1 teaspoon fresh chives, chopped
- 1/2 teaspoon smoked paprika
- 1/4 teaspoon chili flakes (optional)
- 1/4 teaspoon salt
- 1 teaspoon lime juice
Why You Must Try This Grilled Corn on the Cob Recipe
Most grilled corn recipes stop at butter and salt, which is fine but leaves a lot on the table. This version adds a garlic herb butter that you mix ahead and apply while the corn is still hot off the grill — it soaks in immediately rather than sitting on top.
The char from direct heat adds a smokiness that plain boiled corn can’t get close to. Between the garlic, paprika, lime, and fresh herbs, every bite has more going on than the version people usually make. It works as a side at a cookout or as a standalone snack with cold drinks.
Make the Butter First
Mix the softened butter with the garlic, parsley, chives, smoked paprika, chili flakes, salt, and lime juice in a small bowl. Stir until everything is evenly combined. The butter needs to be soft enough to mix easily — if it’s still cold and firm from the fridge, leave it at room temperature for 20 minutes before you start.
You can make this butter up to three days ahead and keep it wrapped in the fridge. Just pull it out before the corn goes on the grill so it’s soft and ready to apply. A compound butter like this is one of those things that costs almost nothing to make and changes the finished dish noticeably.
Prep the Corn
Husk the corn fully and remove as much of the silk as possible. A damp paper towel rubbed over the cob pulls off the fine strands that stick after husking. Once clean, rub each cob lightly with oil and season with salt and pepper.
The oil helps the corn make proper contact with the grill grates and prevents sticking. Don’t soak the corn in water before grilling — that’s a common step that actually slows down charring and leads to steamed corn rather than grilled.
Dry corn on a hot grill is what produces the blistered, slightly smoky result you’re going for.
Get the Grill Hot
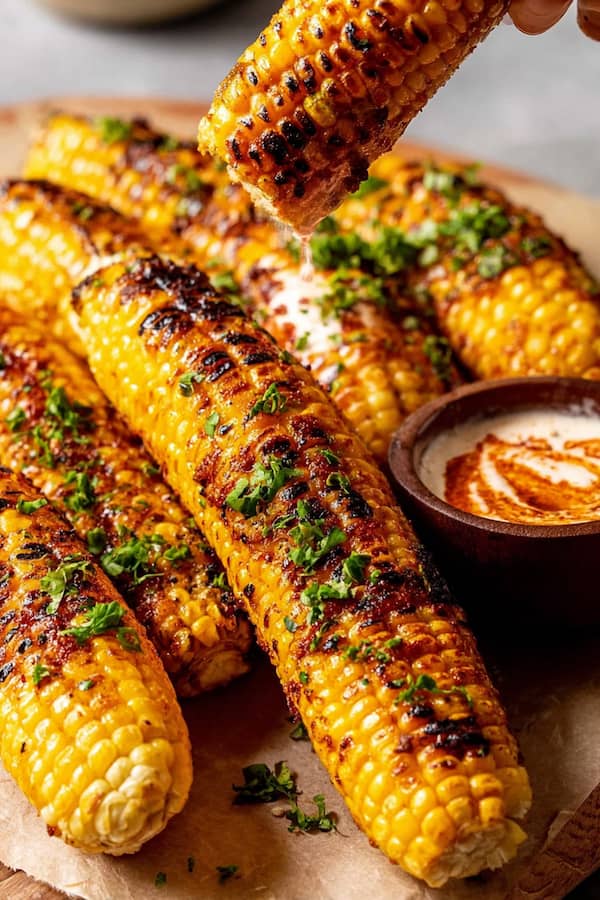
Preheat your grill to medium-high — around 400 to 450°F. Clean the grates well and oil them before putting the corn on. A hot, clean grill is what creates the dark char marks you see in the photos.
If the grates are dirty or the heat is too low, the corn will stick and steam rather than grill. If you’re using a charcoal grill, let the coals develop a white ash coating before you start cooking — that’s when the heat is even and ready.
A gas grill should be preheated with the lid closed for at least 10 minutes.
On the Grill
Place the corn directly on the grill grates. Cook for 10 to 12 minutes total, turning every 2 to 3 minutes so all sides get contact with the heat. You want char on most of the surface — not just a few marks, but actual dark spots where the kernels have blistered and started to caramelize.
Some kernels will get quite dark, and that’s fine. That char is where the flavor is. If your grill has hot spots, rotate the ears around the grate to make sure everything cooks evenly. The corn is done when it’s charred in patches and the kernels look slightly shrunken from the heat.
Butter While Hot
Take the corn off the grill and apply the herb butter immediately. Use a spoon or brush to spread it over each cob while the corn is still steaming. The heat does the work — it melts the butter into the kernels and takes the garlic and herb flavor with it.
If you wait until the corn cools, the butter sits on top rather than absorbing in. Give each cob a generous amount and don’t rush this step. Turn the cob as you go to cover all sides. Finish with a pinch of flaky salt and a squeeze of lime before serving.
How To Make This Grilled Corn on the Cob Recipe Better
A few changes to try depending on what you’re serving it with or who you’re cooking for:
Make it elote-style. After buttering, brush the cob with a thin layer of mayonnaise, roll it in cotija cheese, and dust with chili powder and lime zest. This is the Mexican street corn version and it’s worth making at least once this summer.
Use miso butter instead. Swap one tablespoon of the butter for white miso and skip the salt. The miso adds a savory, slightly sweet depth that works especially well with the char from the grill.
Grill in the husk for a different result. If you leave the husk on and soak it in water for 15 minutes first, the corn steams inside its own wrapper. You won’t get the same char, but the corn stays incredibly juicy. Pull back the husk at the end and char it directly for 2 minutes.
Add parmesan. A fine grating of parmesan over the buttered cob while it’s still hot gives a salty crust as it cools slightly. It pairs particularly well with the smoked paprika in the butter.
Try brown butter instead of regular. Brown the butter in a pan first until it smells nutty, then mix in the herbs and garlic. It takes an extra five minutes and adds a significantly richer, nuttier flavor to the finished corn.
Storage
Grilled corn is best eaten right off the grill. If you have leftovers, wrap them in foil and store in the fridge for up to 2 days. Reheat on a hot grill pan or directly on the grill for 3 to 4 minutes to bring back some of the texture.
You can also cut the kernels off the cob and use them in salads, grain bowls, or the summer corn soup recipe — they hold their smoky flavor well even after a day in the fridge. The herb butter keeps separately for up to a week, tightly wrapped in the refrigerator.
How Do You Know When Grilled Corn Is Done?
The most reliable sign is visual — you’re looking for dark char marks on most of the surface, with some kernels blistered and slightly shrunken. The corn should also smell toasty and slightly sweet from the natural sugars caramelizing on the grill.
If you press a kernel with a fingernail and it gives easily, it’s cooked through. Corn that’s still raw will feel firm and starchy. In terms of timing, 10 to 12 minutes over medium-high heat with regular turning is usually enough for a standard ear. Smaller or thinner ears may be done closer to 8 minutes, so check them a little earlier.
Should You Soak Corn Before Grilling?
Only if you’re grilling it in the husk. Soaking unhusked corn for 15 minutes before grilling prevents the outer husk from burning too quickly and lets the corn steam inside. But if you’re grilling husked corn directly on the grates — which is what this recipe calls for — soaking works against you.
Wet corn takes longer to char, produces steam instead of direct heat contact, and results in a texture that’s closer to boiled than grilled. For the best char and smokiness, grill the corn dry, directly on oiled grates, over proper high heat.
Grilled corn on the cob doesn’t need much to be good — but the herb butter and proper char turn it into something people actually remember. Make the butter ahead, get the grill hot, and don’t pull the corn off too early. That’s really all there is to it.
Ingredients
Method
- Mix softened butter with garlic, parsley, chives, smoked paprika, chili flakes, salt, and lime juice until fully combined. Set aside at room temperature. Can be made up to 3 days ahead and refrigerated.
- Husk the corn fully and remove silk with a damp paper towel. Rub each cob lightly with oil and season with salt and pepper.
- Preheat grill to medium-high (400–450°F). Clean and oil the grates well before adding the corn.
- Place corn directly on the grates. Grill for 10–12 minutes, turning every 2–3 minutes, until charred in patches and kernels are blistered and slightly shrunken.
- Remove corn from the grill immediately. Apply herb butter generously while hot, turning to coat all sides. Finish with flaky salt, fresh herbs, and a squeeze of lime. Serve immediately.
Notes
- Don’t soak husked corn before grilling — it prevents proper charring
- Apply butter while the corn is still steaming hot so it absorbs rather than sits on top
- For elote-style: brush with mayo, roll in cotija, dust with chili powder and lime zest
- Leftover kernels cut off the cob work well in salads, grain bowls, or corn soup
- Herb butter keeps refrigerated for up to 1 week, tightly wrapped